

An IoT Edge Demo instead of words!
In my previous article I covered edge computing, edge IoT, why it matters, what is it, how it works and the benefits it can bring you. Now that we’ve talked quite a lot about the theory, let’s get down to brass tacks and try out Azure IoT Edge for real.
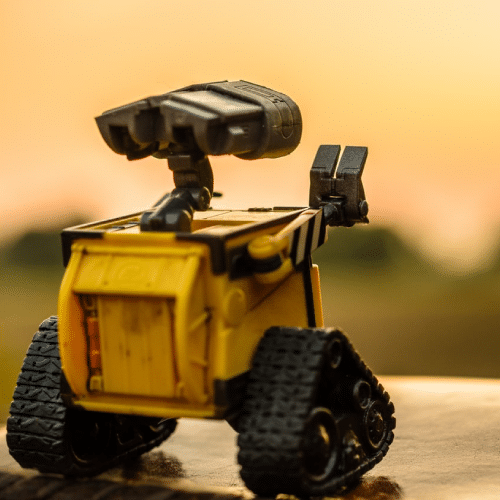
Let’s return to the example of the autonomous car and the case of an emergency stop. In our case, we’re going to use Wall-E’s little brother:
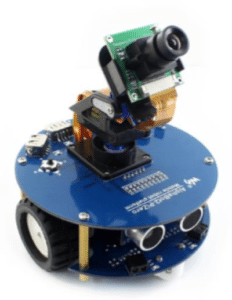
If you want to buy this little robot, follow this link.
An exercise for an Azure IoT Developer
To perform this little exercise, you will need the following:
- An AlphaBot robot with Pi 3 (or an equivalent robot, but requiring a Pi 3. The code should probably be modified)
- An Azure account
- An available “Azure Function”
- An “IoT Hub”
- A “Container Registry”
- Visual Studio Code
- An Internet connection
Your IoT edge autonomous robot, step by step
Create your Azure Container Registry
First, we will create a new “Azure Container Registry”. As we saw above, the “IoT Edge modules” are actually containers stored and versioned in Azure which will then be deployed on different devices. Hence the importance of this module.
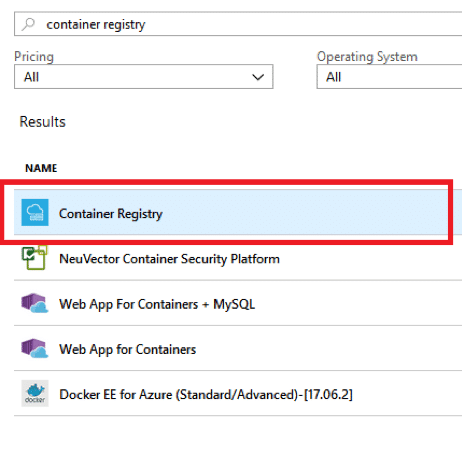
Go to your Azure portal and click on “Create a resource”. Do a search and select “Container Registry”:
A certain amount of information is requested, but only two parts are relevant here: “Registry name” and “Admin user”. Fill out the others based on your Azure subscription, then click “Create”.
The deployment may take a little while. Now we can store all the images we want!
Create your IoT hub to manage and update your devices
Let’s go to “IoT Hub”. This will manage our fleet of devices and update it. Note! This Azure module is not free, make sure that your subscription allows you to use it.
 |
Similarly to the Container Registry, click on “Create a resource”, do a search and create an “IoT Hub”. Here too, several pieces of information will be requested during the creation. You can fill them as you see fit.
Once created, go to “Share access policies” to retrieve login information needed for the deployments. In the list of available policies, choose “device”. You will then have access to the following keys: |

Place the following keys in a notebook:
- Shared access key
- Secondary key
- Connection string – primary key
We will need those later.
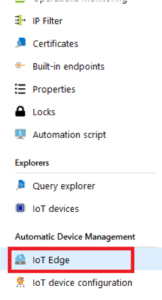
Connect you device to Azure IoT edge
Now go to the “IoT Edge” section of your IoT Hub.
 It is from here that all devices using the Azure “Edge” option will be managed.
You now need to add a new type of device so that it is connected to Azure IoT Edge and can take full advantage of the platform.
Click “Add an IoT Edge device” and give your new device an Id. Do not forget to check the box “Auto-generated keys” to automatically create the keys needed for the new device to function properly.
It will also be necessary to activate the device by checking “Enable”.
Click on “Create”. After a short loading time, you should see it appear in the device list, again in the “IoT Edge” section.
Install the Azure IoT Edge and code your Azure Function
The next step is to install the Azure IoT Edge Runtime on the robot’s Raspberry Pi. To do this, see the tutorial.
From this point, all the Azure components needed to operate our Edge device are now ready. We will start coding our robot and the associated Azure Function.
In this case, we will develop 3 parts:
- An Azure Function that will make the decision to stop the robot or not
- A script for the robot to call the Azure Function
- A script taking just the decision
The goal here is to show the principle of updating Edge modules and the speed of local decision-making.
We will start by writing our Azure Function responsible for making the decision to stop the robot or not. To do this, open VSCode, connect to your Azure account, and create your first Azure Function.
Each Azure C# function created from VSCode consists of a C# script with the same name as the project. In this new file we will create a new static method called “Run” by adding the following decorator:

When we call the URL of our Azure Functions, we must pass the name of this method as a parameter: “RobotDecision”. You can choose the name you want.
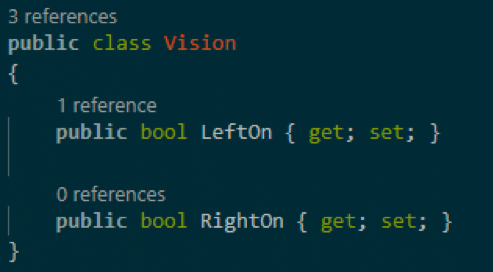
But what will this method do? Make the decision to stop the robot or not. To do this the robot will have to send what it sees to the function. In this case its vision consists only of the two infrared sensors it has on the front: one on the left and one on the right. We will create an object representing this vision:
Our Azure Function is a simple API that is called via an HTTP request. As a result, we can recover the body of data sent:
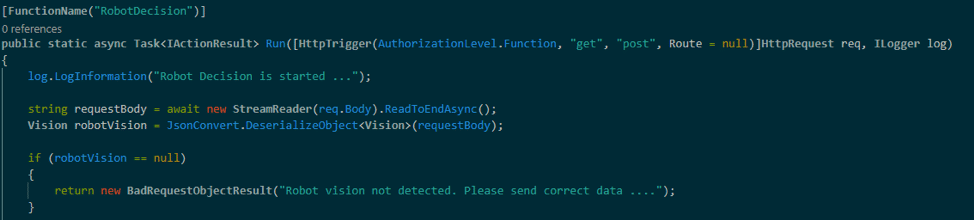
Thus, we recover the body, we convert it to our “Vision” object and we verify that it is not null.
The first part of the work is done: data recovery. Now we have to process that data and make a decision. As you can imagine, nothing is very complicated in the case of an emergency stop: if we see something we stop.

Our “Decision” class is characterized as follows:
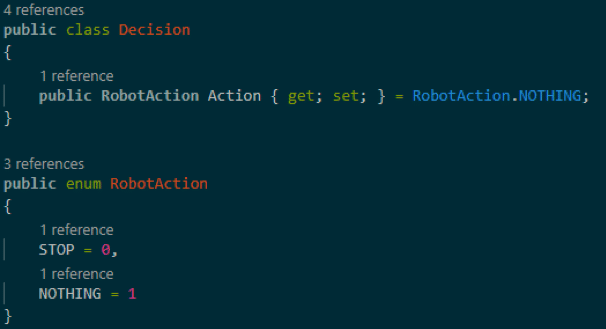
So it could not be simpler. We do not have any more cases so we return the answer to our device:
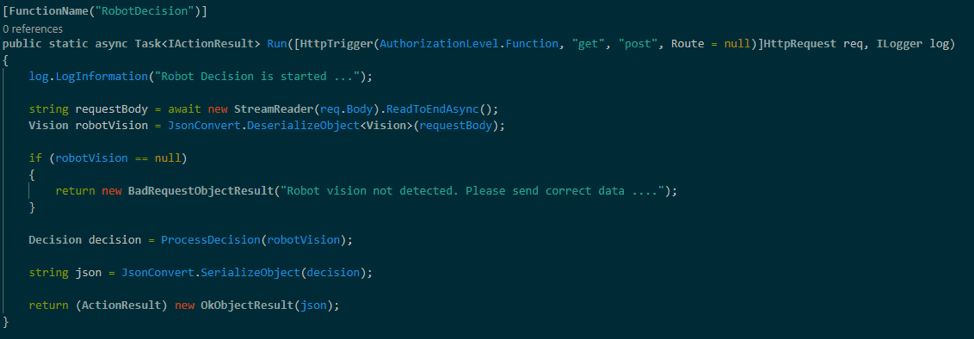
And that’s it! We now have an Azure Function that can make decisions (very simple I grant you) from input data. All you have to do is sync your brand new function to Azure. Once done, test it with Postman to verify that everything is working properly.
Create you IoT edge module
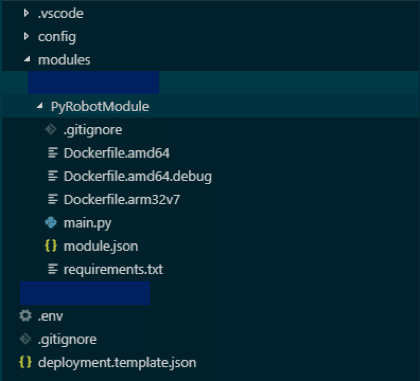
Our first stage is finished. We now have to create our very first IoT Edge module. As the robot is provided with Python code allowing management of its GPIO and Microsoft allows creation of Python modules, it is appropriate to continue with this language.
Open a new VSCode window and open the “Command Palette”. Then select “Azure IoT Edge: New IoT Edge Solution” where several pieces of information will be requested:
- A folder in which to store your project
- A name
- The module type: Python in this case
- And the URL of the docker image: This is the URL of the “Container Registry” that you created previously
The result should look like this:
Deploy
We have not made any changes to our solution yet, but will send it directly to Azure to verify that everything is working properly.
If you have never connected your VSCode to an IoT Hub, follow these instructions:
- In Explorer, select the 3 points on “Azure IoT Hub Devices”
- Select “Select IoT Hub”
- Choose your subscription and then the hub we created previously.
After this, your device and related modules should appear. We can now proceed to the publication of our module. To do this, go to “Command Palette” and select “Azure IoT Edge: Build IoT Edge Module Image”.
This procedure will create a deployable docker image on our robot (make sure you have followed the IoT Edge Runtime installation tutorial on your Raspberry Pi.
Now select the module to deploy. Finally you need to select the type of architecture of the image to be generated. In our case and being under Raspberry Pi 3, we need to choose arm32v7. This will create a “deployement.template.json” file.
Right click on this file and choose “Build and Push IoT Solution”. You have just deployed the image you have generated on Azure. To check, go to the Azure portal in your Container Registry and verify that the image is there.
We must now deploy on the devices concerned. To do this, in the “Azure IoT Hub Devices” section, right-click on the device that needs to receive this module. This is the device we created earlier.
Select “Create deployment for single device” and in the “config” folder choose the file “deployment.json”.
If you go to Azure, you should be able to check in “IoT Edge” that the module has been taken into account and the deployment is pending. And yes for the moment, there is no connected device.
Connect your robot to your IoT edge
We now need to connect our robot to our IoT Edge on Azure. Connect to your robot by SSH (make sure you have followed the IoT Edge Runtime installation tutorial on your Raspberry Pi).
Go to the /etc/iotedge/config.yaml file and add the connection string that we saved earlier to the device_connection_string variable.
Save the file and restart the security service to apply the changes: sudo systemctl restart iotedge.
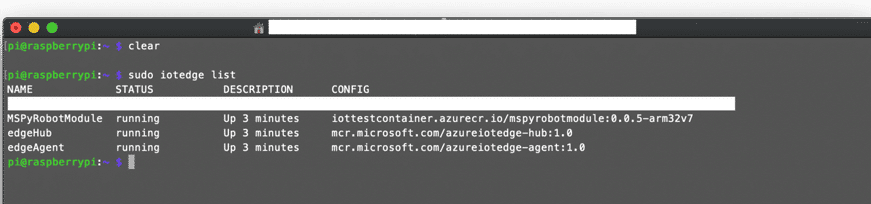
Now let’s check that everything is working correctly: sudo systemctl status iotedge
And now, let’s list the IoT Edge modules on the device: sudo iotedge list
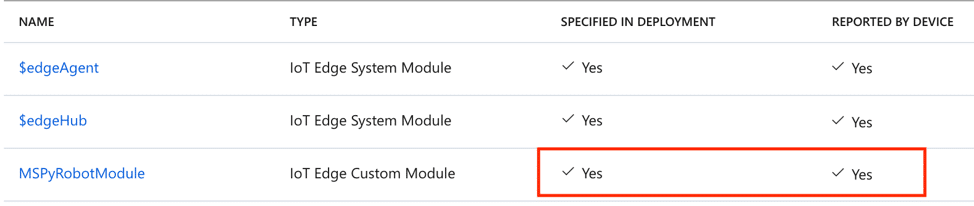
Of course, your Raspberry Pi must be connected to the Internet. If necessary refresh the list several times. If the module installs correctly you should see this on your robot:
And on Azure:
Update the main.py file
So we have managed to send a module designed on our development environment to a remote device. Now we need to update the main.py file with our code to communicate with our Azure Function and send these changes to Azure.
Here is the code for this version of the script:
Deploy to Azure IoT Edge again
Now that you’ve updated the script, all you have to do is deploy to Azure again, as we saw earlier. If everything went well (check on Azure), you will see your robot update.
As you will notice, the robot very often hits the object it has in front of it before stopping. Hence the importance of having an Edge module that will make the decision much faster.
It only remains to test with the latest version of the script, namely local decision making. As you might expect, the condition we were performing in the Azure Function now happens directly on the robot:
If you have performed the entire tutorial with me, you can see the clear difference in response. But if you cannot do it, or if you are impatient to know the result, here’s a video that shows you the emergency stop in action:
Now that you understand how it all works, it’s up to you to improve this concept to handle the transition from connected mode to disconnected without updating. And if possible feedback some relevant telemetries from your robot.
If needed, here’s the link to the main script for the alphabot.
In case you want to learn more about the modules in Edge , have a look to this introduction to Azure ioT Edge modules