Trusted Platform Module: security of your embedded system, what are the basics, and how to use this with Linux?
Nowadays, IoT security is an issue of high concern, whether in companies or personal networks, each connected device plays an important role in sensible data transfer and thus impacts the overall security. That’s where Trusted Platform Module enters the game.
What is TPM (Trusted Platform Module)?
In an effort to ensure a safe environment, a high-security root of trust, TPM (stands for Trusted Platform Module) is used. Trusted Platform Module is a cryptoprocessor that is installed on the embedded device and communicates with the CPU using SPI or I2C, it carries out key handling, cryptographic operations and functions, and certificate management. It has been designed to provide a hardware-based security based on TCG (Trusted Computing Group) standards. The most common TPM hardware security functions are used to verify the content of each element during the boot process of the embedded device. During this boot process, the loaded boot code that is executed (including in the preloader, bootloader, and kernel) can be used to communicate with Trusted Platform Module to verify the integrity of the next element. The succession of integrity checks is used to verify the identity of this device. TPM became an international standard and its key advantages are:
- Key handling (Generation, storing, and limitation usage)
- TPM is deployed with a unique burned RSA key that can be used for most operations
- TPM hardware private key computation
What’s new with Trusted Platform Module 2.0
Trusted Platform Module 2.0 has been specified in a way that it supports multiple algorithms that were lacking in TPM 1.2.
| Algorithm Type | Algorithm Name | TPM 1.2 | TPM 2.0 |
| Asymmetric | RSA 1024 | Yes | Optional |
| RSA 2048 | Yes | Yes | |
| ECC P256 | No | Yes | |
| ECC BN256 | No | Yes | |
| Symmetric | AES 128 | Optional | Yes |
| AES 256 | Optional | Optional | |
| Hash | SHA-1 | Yes | Yes |
| SHA-2 256 | No | Yes | |
| HMAC | SHA-1 | Yes | Yes |
| SHA-2 256 | No | Yes |
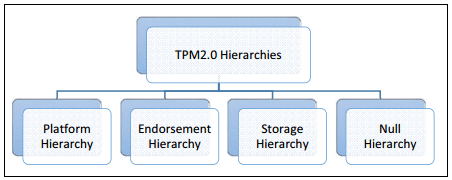
Moreover, TPM 2.0 supports 4 hierarchies whereas the TPM 1.2 only supported a single owner authorization, meaning that a single user or entity has the control on the cryptographic functions (signature, encryption etc…). Trusted Platform Module 2.0 supports, in addition to owner authorization, platform, endorsement, storage and null hierarchies where each hierarchy has its own unique “owner”.
What about Software Implementations?
There are basically 3 main software implementations that respect the TCG TMP2 software stacks.
| Software Stack | Upsides | Downsides |
| TCG TPM2 (TPM2-TSS) |
|
|
| IBM TPM2 |
|
|
| Microsoft TPM2 |
|
|
- Open-source
- Compliant with TCG Specification
- Compatible with Linux and Windows
- Can be used with a TPM simulator
- Lack of some functions (at the time of writing)
- Open-source
- Tools can use OpenSSL keys with TPM functions (useful for debug)
- Compatible with Linux and Windows
- Can be used with a TPM simulator
- Not API compliant with TCG Specification
- Open-source
- Compliant with TCG Specification
- Can be used with a TPM simulator
- Compatible only with Window
How to use Trusted Platform Module within Linux
In this part, we will use the TCG and IBM Software Stack to implement some basic commands. The hardware can be any embedded device with a TPM chip.
Yocto support
Currently, only the TPM2-TSS software stack is officially supported in Yocto. Adding it to your custom image recipe can be done using:
For TPM2.0:
$ IMAGE_INSTALL += “ tpm2.0-tools libtss2 resourcemgr trousers ” |
For TPM1.2:
$ IMAGE_INSTALL += “ tpm-tools resourcemgr trousers ” |
Concerning the lack of functions for TPM2-TSS software stack and for debug purposes, we have a solution for the IBM TPM2 software stack in Yocto.
Basics
This part uses TCG TPM2 Software Stack. The TPM can be accessed from Linux using tpm2.0-tools alongside with TPM2.0-TSS stack.
First of all, let’s look at some self-contained tools. The resource manager needs to be run before running any other command:
$ resourcemgr & |
List all persistent objects present in the Trusted Platform Module (keys for e.g):
$ tpm2_listpersistent |
Generate a random 32 bytes buffer:
$ tpm2_getrandom -s 32 -o random.out |
Caculate the SHA1 hash value of file random.out and output into hash.out:
$ tpm2_hash -H n -g 0x0004 -I random.out -o hash.out -t tk.out |
NV Storage
This part uses TCG TPM2 Software Stack.
The NV storage is a secure memory in the Trusted Platform Module that can be used to store any type of data such X509 certificates.
Define NV index with index number 0x1c00012, size 32 bytes, and attribute word 0x2000A:
# 0x40000001 corresponds to TPM_RH_OWNER
$ tpm2_nvdefine -x 0x1c00012 -a 0x40000001 -s 32 -t 0x2000a |
List NV spaces:
$ tpm2_nvlist |
Write content from file random.out into NV index 0x1c00012:
$ tpm2_nvwrite -x 0x1c00012 -a 0x40000001 -f random.out |
We can read for instance the first 20 bytes of the file we wrote in the NV space starting from offset 0:
$ tpm2_nvread -x 0x1c00012 -a 0x40000001 -o 0 -s 20 |
When we do not need this space anymore, we can release the NV spaces:
$ tpm2_nvrelease -x 0x1c00012 -a 0x40000001 |
Asymmetric signature
Using contexts
This part uses TCG TPM2 Software Stack.
Create a Primary Object in endorsement hierarchy, with RSA keys & SHA256 algorithm and object context saved in file primary_ctx:
$ tpm2_createprimary -A e -g 0x000B -G 0x0001 -C primary_ctx |
Create a RSA key under the previous primary key, with SHA256 algorithm, with public portion saved in key.pub and private portion saved in key.priv:
$ tpm2_create -g 0x000B -G 0x0023 -c primary_ctx -o key_pub -O key_priv |
Load the created RSA key inside the TPM (transient storage meaning that the key will be deleted when the TPM is reset):
$ tpm2_load -c primary_ctx -u key_pub -r key_priv -n anyname -C eccsigning_key_ctx |
Sign a message generated previously (limited from the Trusted Platform Module to 1024 bytes of payload):
$ tpm2_sign -c eccsigning_key_ctx -g 0x000B -m random.out -s signature.bin |
Loads the PUBLIC part only of the key inside the TPM (Keys loaded using tpm2_loadexternal cannot be changed to persistent keys, they stay transient meaning that they will be removed if the TPM is reset):
$ tpm2_loadexternal -H n -u key_pub -C eccsigning_key_ctx2 |
Verify the signature:
$ tpm2_verifysignature -c eccsigning_key_ctx2 -g 0x000B -m random.out -s signature.bin -t ticket3 |
Using a keypair generated from Trusted Platform Module
This part uses IBM TPM2 Software Stack.
Create a primary storage key with handle 0x80000000 (if there is no previous transient handle key, otherwise it will be 0x80000001 or 0x80000002 and so on):
$ createprimary -hi p |
(OPTIONAL) Make the primary transient key with handle 0x80000000 persistent (Note that the range for persistent and transient handles is different):
$ evictcontrol -hi p -ho 80000000 -hp 81800000 |
Generate a key from the TPM using parent handle 0x80000000 (or 0x81800000 if you made the key persistent) and store the private part in tpmpriv.bin and the public part in tpmpub.bin:
$ create -st -hp 0x80000000 -opr tpmpriv.bin -opu tpmpub.bin |
Load the key inside the TPM with a TRANSIENT handle for example 0x80000001:
$ load -hp 80000000 -ipu tpmpub.bin -ipr tpmpriv.bin |
Make the transient key with handle 0x80000001 persistent (Note that the range for persistent and transient handles is different):
$ evictcontrol -hi p -ho 80000001 -hp 81800001 |
Sign a message generated previously (limited from the TPM to 1024 bytes of payload):
$ sign -hk 81800001 -halg sha256 -if random.out -os sig.bin |
Verify signature:
$ verifysignature -hk 81800001 -halg sha256 -if random.out -is sig.bin |
Using a keypair generated with OpenSSL
This part uses IBM TPM2 Software Stack.
The steps are similar to previously but instead of creating a key from parent handle, we will import OpenSSL keypair into the Trusted Platform Module using parent handle.
Generate an OpenSSL key:
$ openssl genrsa -out keypair.pem 2048 |
Create a primary storage key with handle 0x80000000 (if there is no previous transient handle key, otherwise it will be 0x80000001 or 0x80000002 and so on):
$ createprimary -hi p |
(OPTIONAL) Make the primary transient key with handle 0x80000000 persistent (Note that the range for persistent and transient handles is different):
$ evictcontrol -hi p -ho 80000000 -hp 81800000 |
Import OpenSSL keypair into the Trusted Platform Module using parent handle 0x80000000 (or 0x81800000 if you made the key persistent). This function is not API compatible and has been made for test, debugging purposes. It returns an available transient handle for example 0x80000001:
$ importpem -hp 80000000 -ipem keypair.pem -opu tmppub.bin -opr tmppriv.bin -halg sha256 |
Make the transient key with handle 0x80000001 persistent (Note that the range for persistent and transient handles is different):
$ evictcontrol -hi p -ho 80000001 -hp 81800001 |
Sign a message generated previously (limited from the TPM to 1024 bytes of payload):
$ sign -hk 81800001 -halg sha256 -if random.out -os sig.bin |
Verify signature:
$ verifysignature -hk 81800001 -halg sha256 -if random.out -is sig.bin |
Keys handling
This part uses IBM TPM2 Software Stack. The keys generated can be transient or persistent. Transient keys do not persist after a reset unlike persistent keys.
From our hardware the Trusted Platform Module could only have 3 transient keys generated simultaneously with handle:
0x80000000, 0x80000001 and 0x80000002
If you still need more transient handles, you will need to erase one of them using the following command. This will erase the transient key and free the memory to create a new one:
$ flushcontext -ha 80000000 |
Persistent keys can also be deleted:
$ evictcontrol -hi p -ho 81800000 -hp 81800000 |
The TPM gives the mechanisms to implement secure boot processes using signature/verification functions with advanced key handling processing.
This article should give you the basic usage of the Trusted Platform Module using the available tools. Major utilization of the TPM has not been highlighted throughout this document and will be discussed in future articles. For more help with your embedded and IoT security needs, Witekio or your trusted co-pilot in device hardening.


