Welcome to the second article of our Patient Monitoring project. Patient monitoring is a crucial tool for medical professionals to acquire the most accurate information on the physical condition of a person such as blood pressure, body position, temperature, or glucose level. As decided and stated in our previous article, we chose Qt as a framework for several reasons:
- Simplicity and stability on major platforms
- Responsive & Cross-platform using QML
- Well-documented
In this article, we will continue digging into Qt, application design and 3D hardware acceleration to provide an optimized and user-friendly interface.
Qt key functionalities for our project
 In order to develop our project’s application, the Qt Company offers Qt software under two different licenses: commercial and open source. The commercial license gives us the full rights to create and distribute software on your own terms .
The open source version is available under GPL and LGPLv3, which makes it ideal for student/academic purposes, hobby projects, internal research projects without external distribution, or other projects where all (L)GPL obligations can be met. For more information on licensing, consult the following link: https://www.qt.io/licensing-comparison/
The Patient Monitoring project uses the open source license for the GUI application.
The latest version of the software at the time of writing is Qt 5. The installation package contains Qt libraries, examples, documentation, and the necessary development tools, such as the Qt Creator integrated development environment (IDE).
The main feature of Qt is the ability to be cross-platform and in Qt Creator this is accomplished through the definition of kits. Each kit consists of a set of values that define one environment, such as a device, compiler, Qt version, and debugger command to use. Previously, we had defined a folder called ~/HealthSensor/ti-arago-am437x-evm-sdk, where all the mandatory binaries for defining a kit are stored.
Qt 5 provides two different options for painting components on the screen:
- The imperative QPainter API (provided for backwards compatibility with Qt 4.8)
- QML using scene graph back-end
Qt uses a particular declarative language called QML. It allows user interfaces to be described in terms of their visual components and how they interact and relate with one another. A person with experience on JavaScript will feel right at home programming on QML. In our use-case, we will use QML and scene graph back-end for our application because it is suitable for embedded user interfaces. QML allows fast user interfaces with easy animation work flow and great modularization of components.
It is important to note that while the UI of the application is written in QML, Qt relies on C++ as the backend for the framework. This permits the programmer to extend the functionality of QML, define application logic and provide data access with C++ objects.
The Qt Quick module is the standard library for writing applications. While the Qt QML module provides the QML engine and language infrastructure, the Qt Quick module provides all the basic types necessary for creating user interfaces with QML. Qt Quick provides a visual canvas and includes types for creating and animating visual components, receiving user input, creating data models and views, and delayed object instantiation.
The most basic visual item in Qt Quick is provided by the QQuickItem class. All visual items are inherited from this class and although a QQuickItem instance has no visual appearance, it defines properties such as position, width, height and key handling support.
Hardware requirement for Qt rendering
As we are heavily relying on 3D hardware acceleration, it is important to make sure the GPU is able to handle the workload we require for our application. One of the reasons we selected TI’s AM437x SoC was because of the inclusion of a PowerVR SGX530 (refer to the previous article for requirements details).
The SGX530 is a member of the PowerVR Series5 family of GPU IP cores developed by Imagination Technologies that is fully compliant with Khronos OpenGL ES 1.1 and 2.0. The proprietary Tile-Based Deferred Rendering (TBDR) architecture enables it to deliver up to 20M polygons per second. An essential part of our application is the display of data obtained by the sensors. Typically, presentation of clinical measurements is done through plots which are constantly updated over time. Being able to display several data points at a fast rate is vital in order to correctly assess the health of an individual. The Patient Monitoring project uses Qt and QML as back-end to allow making usage of the GPU potential in order to enable animation and render complex forms.
QML coming to the aid…
The QML framework provided by Qt is used to develop applications using QML languages. The QML language will not be described here, for more information, refer to the official Qt documentation: http://doc.qt.io/qt-5/qmlapplications.html

QML is a lightweight declarative language that uses the power of Qt to ease development of embedded systems applications. It integrates a module that provides a QML and C++ API to allow developers extending QML language. Thus, UI and animation can easily be integrated in the application written in C++ and can be portable to other graphical applications.
For the reasons above, the Patient Monitoring project uses QML as main development language with Qt. However, it does not only depend on QML but also on QPainter API.
QPainter for advanced images and signal handling
QPainter provides an API for drawing shapes, text and images onto many different surfaces, or QPaintDevice instances. QPainter uses different back-ends, or QPaintEngines, depending on what kind of surface you are drawing on. The two most important ones are the software rasterizer and the OpenGL back-end.
The raster paint engine is Qt’s software rasterizer, and is used when drawing on a QImage (Qt’s hardware-independent image representation) or QWidget (base class of all user interface objects).
The OpenGL paint engine uses hardware accelerated OpenGL (ES) calls. It is important to note that when using this back-end the drawing commands need to be carefully ordered to avoid numerous state changes and achieve optimal performance.
The interaction of the user with the screen uses the QWidget mechanism to allow handling the pressing signals (double press, release …) by using function like QWidget::mousePressEvent, Qwidget::mouseReleaseEvent. The application also makes usage of the QImage features and functionalities for internal plot graph mechanism.
Scene graphs to optimize rendering
A scene graph is a data structure which arranges the logical and spatial representation of a graphical scene. The main advantage of using this data structure is that the scene to be rendered can be retained between frames, and the complete set of primitives to be rendered is known before rendering starts. This means that performance optimizations such as batch rendering and discarding of obscured primitives are inherently achieved.
In Qt, scene graph uses OpenGL 2.0 and OpenGL ES 2.0 directly, instead of going through QPainter. This means that all the resources, like geometry, textures and shaders can be stored in a format suitable for OpenGL rather than going through the burden of using other classes.
On many platforms, including our TI AM437x platform, used for the Patient Monitoring project, the scene graph will be rendered on a dedicated render thread while the GUI thread is preparing the next frame’s state. This is done to increase parallelism of multi-core processors available and make better use of stall times such as waiting for a blocking swap buffer call.
In Qt, the scene graph is composed of many predefined node types, each serving a dedicated purpose. The Patient Monitoring project uses the following nodes (note that other nodes are available but will not be discussed in this article) :
– QSGNode: The base class for all nodes in the scene graph
– QSGGeometryNode: Used for all rendered content in the scene graph and to specify custom graphics by defining its geometry and material.
Another approach to improve performance is to leverage the scene graph implementation and extend the functionality of QtQuickItem through C++. To add custom content into the scene graph we can subclass QQuickItem, setting the QQuickItem::ItemHasContents flag and re-implementing the QQuickItem::updatePaintNode() function. The function returns a node which is the root of the scene graph subtree for the item. Out of all the nodes available in Qt, the most important for the application is the QSGGeometryNode.
For our use case, we can define a list of 2D points to represent the incoming information from the sensors and setting the drawing mode as GL_LINE_STRIP.
Below is a code snippet of the QQuickItem::updatePaintNode() function in the CustomGraph class implemented for the Patient Monitoring application.
QSGNode *CustomGraph::updatePaintNode(QSGNode *oldNode, UpdatePaintNodeData *)_x000D_
{_x000D_
    QSGGeometryNode *node = 0;_x000D_
    QSGGeometry *geometry = 0;_x000D_
    if (!oldNode) {_x000D_
        node = new QSGGeometryNode;_x000D_
        geometry = new QSGGeometry(QSGGeometry::defaultAttributes_Point2D(), dataPointsSize);_x000D_
        geometry->setLineWidth(1);_x000D_
        geometry->setDrawingMode(GL_LINE_STRIP);_x000D_
        node->setGeometry(geometry);_x000D_
        node->setFlag(QSGNode::OwnsGeometry);_x000D_
        QSGFlatColorMaterial *material = new QSGFlatColorMaterial;_x000D_
        material->setColor(Qt::white);_x000D_
        node->setMaterial(material);_x000D_
        node->setFlag(QSGNode::OwnsMaterial);_x000D_
    } else {_x000D_
        node = static_cast<QSGGeometryNode *>(oldNode);_x000D_
        geometry = node->geometry();_x000D_
        geometry->allocate(dataPointsSize);_x000D_
    }_x000D_
    node->markDirty(QSGNode::DirtyGeometry);_x000D_
_x000D_
    return node;_x000D_
} |
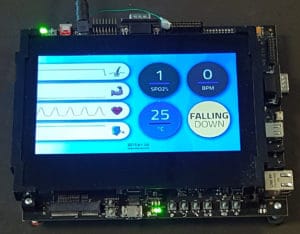
Here is the first overview of our
Patient Monitoring UI solution
In this second article, we covered the basics of Qt functionalities that were used in the Patient Monitoring application and some extended methods to improve performance. In the next step, we will discuss about the deployment of the application in the Cloud.